-
Do you know how to test the circular locus mothed fabric surface pilling tester?
Edited by:Read:The circular locus mothed fabric surface pilling tester test method is a step-by-step guide
Pilling occurs when fabrics are rubbed together. Pilling can be broadly divided into three stages: the creation of a pile, the formation of a pile and the shedding of a pile.
Pilling not only affects the appearance of the fabric, but also reduces the fabric's serviceability.
Currently, there are four methods for testing pilling in fabrics:
The round track method, the Martindale method, the pilling box method and the random rolling method.

At home and abroad, the five-level system is used to evaluate the degree of pilling of the fabric, the greater the number of levels, the better the pilling of the fabric
I. Experimental purpose and requirements
According to the standard GB/T 4802.1 "fabric pilling test round track method", GB/T 4802.2 "fabric pilling test Martindale method", GB/T 4802.3 "fabric pilling test pilling box method", the method specified, do pilling test
This chapter learns to test the pilling performance of fabrics with a pilling instrument. Through the test, master the basic principles of fabric pilling and test methods.
II. Experimental apparatus and tools
Comply with the standard:
GB/T 4802.1 JIG 040.
Applicable standards.
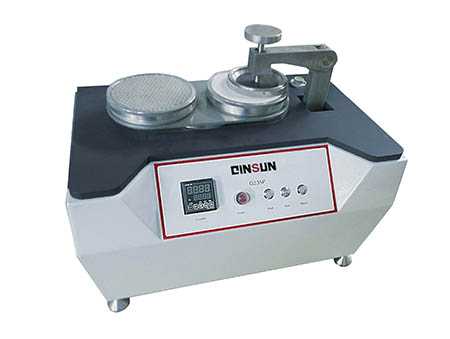
This instrument is used to test the pilling balloon condition of woollen fabrics, chemical fibre cotton, blended, knitted and woven fabrics to identify the product quality and process effect. The fabric is tested by rubbing against nylon brushes and abrasives, or against abrasives only in the condition of moisture conditioning.

Technical features:
Contact gap between the abrasive head and the abrasive table surface ≤ 0.2 mm
Parallelism between grinding head and table ≤ 0.3mm
The relative movement of the grinding head and the grinding table is 40±1mm.
Flat nylon brush surface, height difference <0.5mm
Reciprocating speed of the grinding machine 60±1 times/min
Weight of grinding head 490cN±1%
Weight of large hammer 290cN±1%
Weight of small weight hammer 100cN±1%
Number of times to choose 1~9999
Meet standard test requirements
III. Sample specimens
Knitted fabric, several pieces of woven fabric.
Cut to a diameter of 113mm round chemical fiber fabric 3 pieces, wool fabric 5 pieces, the specimen will be placed in the standard atmosphere to adjust the wet more than 16h, and then test.
Why do samples need to be conditioned? Please refer to this article "Why do we need to adjust the humidity before textile testing?
IV. Experimental methods and procedures
4.1 Sample preparation:
Cut 5 circular samples from the sample, each with a diameter of (113 ± 0.5) mm. mark the back side of the fabric on each sample. If the fabric does not have a distinct front and back side, both sides are tested. Another comparison sample, of the same dimensions as the sample, is required for the evaluation.
Use a 100cm2 (3013mm) disc sampler to take a sample directly at the sampling point
With the circular sampling template: Place the circular template on the fabric to be sampled, draw a cut line with a pen along the edge of the template and cut the specimen with scissors.
Note: When sampling, the sample should not include the same warp and weft yarns.
4.2 Preparation for the experiment
The apparatus should be placed horizontally and the nylon brush should be kept clean. If the apparatus is used daily, clean it at least once a week. Clean the brushes with a suitable solvent (e.g. acetone), comb out any short lint with a hand brush and remove any protruding nylon filaments with a clamp.
Attach the foam spacer, specimen and abrasive to the test chuck and abrasive table respectively, with the specimen facing outwards.
The test parameters are selected according to the fabric type in accordance with the five test parameters specified in Table 1.
Note 1: Other fabrics not listed in Table 1 can be referred to similar fabrics as described in Table 1 or the parameters can be selected according to the agreement of the parties concerned.
Note 2: It is not expected that all types of fabric will test or pucker when worn. Therefore, for fabrics with special constructions, the parties concerned may agree on the number of pilling.
4.3 Experimental procedure
Load the specimen and abrasive, apply pressure to the fabric specimen according to the label in Table 1, set the number of times and start the apparatus to the preset number of times.
4.4 Evaluation of hairballs
The rating box should be placed in a dark room, i.e. a dark chamber.
Place 1 tested sample and 1 untested comparison sample side by side along the fabric in the middle of the specimen plate of the rating box. Secure in the correct position with PVC tape if required. The tested sample is placed on the left and the untested sample on the right. If the test sample was pre-treated before the pilling test, the comparison sample should also be the pre-treated sample. If the test sample was not pretreated prior to testing, the comparison sample should be the unpretreated sample.
To ensure an objective and accurate evaluation, the following points should be noted.
To prevent direct lighting, look at the sample directly from the front of the sample, at the edge of the evaluation box.
Due to the subjective nature of the evaluation, it is recommended that more than one person carry out the evaluation.
Record other instances of surface variation.
Record the rating of each sample and calculate the average of the assessment results. If the average of the test results is not a whole number, the nearest half grade is taken. The difference between the test result and the mean should not exceed half a grade. If more than half a grade is exceeded, the number of grades for each sample should be reported.
V. Requirements for the laboratory report
Record: sample name and specification, instrument type, instrument operating parameters, raw data.
Evaluation: number of puckering grades.
- 2024-04-19Paper ring compression strength tester standards
- 2024-04-19Cupping tester standards
- 2024-04-19Rubber and plastic tensile tester standards
- 2024-04-19Taber 1750 wear-resistant tester standards
- 2024-04-19Stone Chip Resistance Gravelometer standards
- 2024-04-18Diaper absorption speed tester standards
- 2024-04-18Diaper leakage tester technical indicators
- 2024-04-18Paint film impact resistance tester standards
- 2024-04-18Low temperature brittleness tester principle
- 2024-04-18Battery separator permeability tester technical indicators


